

Teaching garden
Planting a teaching garden is like building an outdoor classroom. Topics as specific as butterfly biology or as general as ecology or conservation can be explored in the context of your garden. Teaching gardens are the perfect launching pad for student-directed inquiry. Interested students will quickly ask a wide variety of questions, many of which could lead to in depth observations or experimental manipulations. Ultimately, the best way for your class to use your teaching gardens is to follow explorations in the directions your students lead. For general butterfly gardening information, visit our Butterfly House website. Following are a few ideas to help your classes get started.
Planning the Garden
Involve your students every step of the way.
1. Let the students do the planning
Ask them what they would like in their garden. For example, if your garden is going to be for butterflies, send your students to the library or the Internet to do some research of their own. Ask them to consider questions such as these:
- What is their favorite local butterfly? (Alternatively, each student or small group can be assigned a particular butterfly to investigate.)
- What does that butterfly look like at different stages of its life?
- How does it survive the winter? (Does it migrate? Does it need shelter?)
- What does it need to live throughout its entire life cycle?
- What is its host plant?
- Where and when does it pupate? Does it stay on the host plant to pupate?
- Does this butterfly have any particularly favorite nectar sources, or is it a generalist?
- Does this butterfly have any interesting behaviors?
- How does this butterfly protect itself?
- What does the host plant look like? Does it have nice flowers so it can also be a nectar source?
- What are the needs of the host plant? (Full sun vs. shade, sandy soil or clay-like soil, etc.)
Help the students to decide what of this information is important for planning their garden. Students can present the result of their research to the rest of the class. The class can then begin to compile a list of the plants they need to have in their garden.
2. Take a nature walk around the school.
When the students have learned a little bit about the kinds of plants they want in the garden, they must next consider where to put the garden. Take the class on a walk around the school property to help decide where a good location for a garden will be. When you and your class are considering particular locations, ask yourselves the following questions about each potential site:
- How much sunlight or shade does the area receive each day? To answer this question, you may need to take a few nature walks on at different times of the day. A butterfly garden requires sunlight during most of the day in order to attract butterflies. If you want to plant your garden next to a building, consider
- How much wind does the area get? Avoid areas that are prone to lots of wind.
- How close is the area to a source of water so the garden can be watered easily?
- How much disturbance will the area receive? A site right next to the playground or parking lot may be too busy for butterflies to feel safe. Consider a site with a minimum amount of daily activity around it.
During your nature walk, take time to stop and identify the trees and shrubs available on school property.
- Are any of the trees or shrubs around the building host plants for native butterfly and moth larvae? If you cannot identify a tree or shrub quickly on your walk, you may want to pick a leaf (and any fruit or flowers if there are any present) and take it in to the library to help identify it.
- If the season is right, can the students find any caterpillars on their walk around the school?
- Do you see any butterflies while walking around the school? If so, be sure to plant their host plants in the garden you are planning.
3. Preparing plants for the garden
During the winter months, your classes can begin to grow plants for the garden from seeds. Not all plants you may want in your garden are practical to grow from seeds, but many are. Be sure to carefully follow planting instructions for each plant type so your seedlings will be large enough for planting in the spring.
Begin to make plans for where additional plants may be purchased. Consider asking local nurseries for donations in return for any publicity they might receive. Also make plans for preparing the soil for planting.
4. Plant the garden!
It may not be practical to plant your garden during school hours. If not, enlist help from families and other community members to do it over a weekend or two. If the children participate in planting the garden themselves, it will mean more to them!
Using the Garden
Insects will call your garden home as soon as you plant it. Here are some basic activities you can do in the garden with your students:
1. A bug's life
Have your students "think like a bug" while they search for an interesting insect in the garden. Once they have found such an insect, have them make careful observations for at least 15 minutes. Students should take very careful note of all the details of the insect they can. Because of this, it may be helpful for students to work in pairs. It is very easy for anyone to lose track of an insect during the split second they are looking at their notebook instead. Some ideas of what they should observe include:
- What does it look like?
- Does it fly, hop, or walk? Is it fast or slow?
- What does it eat?
- What kinds of interesting things is it doing?
- How long does it behave in a particular way?
- What does the habitat around it look like (shady, sunny, shrubby, open, etc.)?
- Does it interact with other insects in the garden?
If the insect a student is observing flies away or otherwise disappears, he or she should find another insect and immediately start observing that one.
When the time allotted for this observation is over, consider having students "follow up" on their observations in the classroom or library. Encourage them to identify the insect they were observing based on characteristics they noted. It can be very difficult to identify most insects by species. Identification to order or family (ex: dragonfly, bee, moth) may be the best a student (or even an entomologist) can do.
2. Garden journaling or field notebooks
Students should keep a journal of their experiences in the garden. Specifically, their journal should include observations of what kinds of insects (or other animals) they observe, as well as other changes they see in the garden. An activity such as this should help them see trends across the seasons. For example, in the early Spring they are likely to note the new growth of the plants and the appearance of insect nymphs and larvae. As the spring progresses, the plants and the insects mature. Flowers begin to bloom. Perhaps a new generation of insects appears. In the Fall they may notice all Monarch butterflies tend to fly in a similar direction (south or southwest) and then the next week, they are gone. Encourage the students to share and discuss their observations with one another. Students may see these trends clearly; even if they do not know how to identify a particular insect or what life stage it is in.
Encourage students to continue to visit the garden in the summer, even if they are not in school. Journaling about the natural world can become a lifetime pursuit. By observing trends season after season or year after year, students will solidify their understanding and awareness of the world around them.
When a student is taking notes in a field notebook, he or she should always note the following characteristics in each observation:
- Date: April 10, 2000
- Time of day: 10:30 AM
- Weather: Very sunny, a few small clouds, light breeze
- General location of observation: my back yard, St. Louis County
- Specific location of observation: sunny patch with shrubby vegetation, some violets and daisies in the yard, some other flowers (red and orange)
- Description of the animal they are observing: Large insect with yellow and black bands around its abdomen. Makes a loud buzzing noise when it flies. Seems to be a bumblebee.
- Behavior of animal: Flying between patches of different kinds of flowers. Stops and seems to sample
- Behavior of any other animals your animal of interest might come in contact with: butterflies visiting the same flower patches seem to not notice the presence of this insect.
- Detailed notes such as these will help students to make identifications of the animals they have been observing. Notes which include information such as date, time of day, and weather will also allow students to begin to draw conclusions about trends such as what time of day a particular insect may be most active, or that on cloudy or rainy days they see fewer insects.
3. Tracking the life of a particular insect in the garden
If students find an interesting insect, they can build a little "cage" that allows them to observe that insect in its natural setting over the course of several days. The insect can easily be "trapped" by a bag made of bridal netting. Before you do this, BE CERTAIN that your insect does not eat other insects. If it does, you will starve it to death by trapping it in a location where it cannot get new prey items.
What you need:
- A bag sewn out of bridal netting of an appropriate size for the plant you observe the insect on (Make several of these in advance so you have a variety of sizes available.)
- Lightweight cord or yarn
When you find your herbivorous insect you can "trap" it by placing the bag over it and a large section of the plant. Tighten the open end of the bag around the branch with cord or yarn. Be sure to tighten this end enough to keep the insect inside, but not so much that you damage the plant.
Observe the insect every day to see what it is doing. Can you see how much it has eaten? If it was an immature insect, can you see it growing? Has it molted?
Be sure to NOT trap any insects, such as butterflies, that need to fly from one food source to the next. Also avoid trapping any large insect that could hurt its wings trying to fly away. Finally, only use this trick with insects that are herbivorous (eat plants). If you try this with any insects that are predators you must choose a section of a plant that already has plenty of prey items available on it. This experiment is perfect for caterpillars or planthoppers. This may also work well with ladybugs, as long as you find them on a section of a plant that has plenty of aphids available for food.
4. Learning about predator/prey relationships
If you plant your garden with the intention of attracting and observing any kind of insect, including butterflies, pesticides must NEVER be used. Any chemicals designed kill insects that you do not want in your garden will also kill the insects you like! If you plant a garden with a variety of plant types, you should be able to avoid any infestations that could wipe out your garden. However, you can help control any pests in the garden by introducing insects that are predators. This practice of sing predators to control pests is commonly called "biocontrol". Introducing predators in your teaching garden will not only help control pests. It also gives your class a perfect reason to study predator/prey relationships and observe them first hand in the garden.
Some particularly good predators you can release and observe in your garden are:
- Lacewings: This insect is a predator of aphids, scale, plant lice, mealybugs, whiteflies, and thrips, as well as a variety of insect larvae. The drawback is that they can and do attack young caterpillars. You can order lacewings for release as either eggs or larvae, so it can also be an opportunity for your class to observe metamorphosis in the garden.
- Ladybugs: Ladybugs are an excellent predator of aphids, and a favorite insect for many!
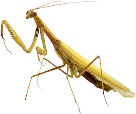
- Praying Mantids: Mantids are an excellent predator of a variety of insects, though this may include a few unsuspecting butterflies. Mantids are released into your garden from an egg case. Students can observe their metamorphosis, though this will occur through the course of an entire summer.
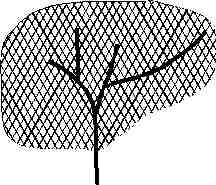
5. Winter scavenger hunt
The garden is still alive in the dead of winter! Your teaching garden does not lose its teaching value when the leaves fall off the trees and the plants become dead or dormant. All insects must survive the winter somehow! While the Monarch butterfly flies thousands of miles south to avoid the dead of a Missouri winter most other Missouri insects stay in Missouri. You can hunt for signs of them during the winter. Insects can overwinter as eggs, nymphs, larvae, pupae, or adults.
Challenge your students to discover insect life in the dead of winter. Cocoons and chrysalides may even be easier to find in the winter when the leaves are off the trees. Many moths, including the Luna Moth and the Cecropia Moth incorporate leaves into their cocoons. Therefore, look for leaves that are still attached to otherwise naked trees in the dead of winter. Students can root around in the mulch or leaf litter and see what they can find. Some insect larvae spend the winter in galls. Galls are formed when the adult female insect lays eggs inside plant tissue. Hormones injected by the female insect causes the plant itself to grow new tissue around the egg. This tissue looks like a large knob or wart on a leaf, or a swelling on a stem of tall grasses or branch. Some such galls are easy to cut open with just a fingernail. Inside students may find a larva of one sort or another.