Butterfly arts and crafts
Pasta metamorphosis
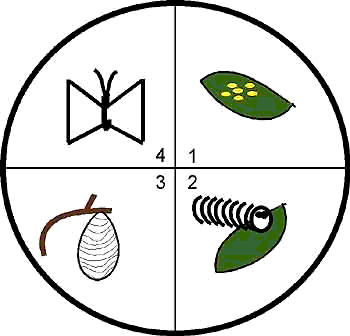
Your students can make a unique art project that demonstrates the entire life cycle of the butterfly using different kinds of pasta.

What you need:
|
Optional:
|
1. Draw a "+" on the paper plate to divide it into four separate parts. Number the four "pie pieces" consecutively.
2. Cut the paper or felt into leaf shapes, and glue one of these leaves into parts one and two.
3. Glue the twig into part 3.
4. On top of the leaf in part 1, glue a few pieces of orzo pasta. This should look like butterfly eggs on a leaf.
5. On top of the leaf in part 2, glue a piece of corkscrew pasta. This is your caterpillar. The caterpillar can be painted with tempera paint or left in its original color. Either glue wiggly eyes onto the caterpillar, or draw them on with a marker.
6. Glue a piece of shell pasta so it looks like it is hanging off the twig in section 3. This is your butterfly's chrysalis. You can paint the chrysalis brown or green.
7. Twist a small piece of pipe cleaner around the middle of a piece of bowtie pasta, leaving the ends of the pipe cleaner exposed and at a "v" so it looks like antennae. This is your butterfly. The butterfly can be painted or colored with markers. Wiggly eyes can be glued on the butterfly.
8. Glue the butterfly made of bowtie pasta into space number 4 on the paper plate. The butterfly metamorphosis is now complete!
Metamorphosis butterfly card
This simple project shows the caterpillar, chrysalis, and butterfly stages of a butterfly's life.

Items needed:
- Light colored construction paper
- Crayons
- Scissors
1. Fold the paper in half. Draw a kidney-bean shape on the paper so that the side of the kidney bean without the indentation is against the fold.
2. Cut around the kidney bean shape, leaving the folded edge uncut. Unfold the paper.
3. With the paper unfolded, color it to make it look like a butterfly on one side.
4. Fold the paper on its original fold line with the butterfly design on the inside. On one of the exposed sides, draw a caterpillar. Remember that caterpillars have five simple eyes on each side of their head instead of one big eye!
5. Flip the card over so the remaining uncolored side is exposed. Make this side look like a chrysalis.
Tissue paper butterflies

Items needed:
- Clothespin
- Pipe cleaners
- Tissue paper (the more colorful, the better)
- Markers
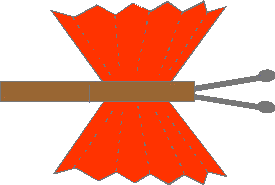
1. Cut approximately 10 inch squares of tissue paper.
2. Fold the tissue paper "accordion style".
3. Clip the gathered paper into the clothespin.
4. Bend the pipe cleaner in the middle to form a "V." Bend the ends of the "V" again in order to create little knobs on the tips of the "antennae."
5. Clip the bent center of the antennae into the tip of the clothespin.
6. Draw eyes on the tip of the clothespin by the antennae.
Variations include:
- Use two different colors (or patterns) of tissue paper so that the butterfly is a different color on each side.
- Use white paper instead of tissue paper and allow the students to color a design on their butterfly wings before they assemble the butterfly.
Stained glass butterflies:
This project is beautiful when hung in a window to catch the sun!

Items Needed:
- 2 pieces of waxed paper, approximately 18 inches long
- Crayon shavings
- Construction paper
- Rubber cement
- Warm Iron
- Newspaper
- Pipe Cleaners
- Tape
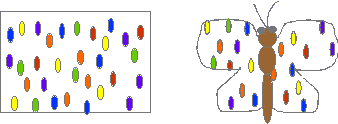
1. Lay a piece of waxed paper approximately 18 inches long over an old piece of newspaper.
2. Sprinkle crayon shavings of various colors all the waxed paper.
3. Lay a second piece of waxed paper over the crayon shavings.
4. Cover the waxed paper with another sheet of newspaper.
5. Using a warm iron, gently press the newspaper with the waxed paper underneath until the crayon shavings melt and fuse the two pieces of waxed paper together.
6. Let the waxed paper and crayon shavings cool.
7. Cut butterfly wings out of the waxed paper and crayon shavings.
8. Cut a head, thorax, and abdomen out of construction paper. Glue the butterfly body onto the butterfly wings.
9. Tape pipe cleaners to the head for antennae.
10. Tape the butterfly in a window.
Butterfly valentines:
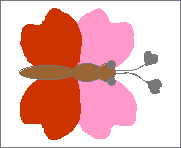
This project may be particularly fun for your students around Valentine's Day.

What you need:
|
Optional:
|
1. Cut out heart shapes. Each butterfly valentine will require 4 large hearts (of approximately the same size and shape) and 2 very small ones.
2. Cut out ovals of the correct size to make an abdomen, thorax, and head
3. Cut out small circles for eyes, unless you have other items such as sequins to use for eyes.
4. Cut out two long, thin rectangles for antennae, unless you are using pipe cleaners. (Alternatively you can also draw the thin shafts of the antennae.)
5. Assemble the butterfly as shown.


